Hosting Through IIS Instead of the Integrated Web Server
- 28 Sep 2023
- 3 Minutes to read
- Print
- DarkLight
- PDF
Hosting Through IIS Instead of the Integrated Web Server
- Updated on 28 Sep 2023
- 3 Minutes to read
- Print
- DarkLight
- PDF
Article Summary
Share feedback
Thanks for sharing your feedback!
When you install any of our products using the installer, you're presented with two application hosting options: Integrated Web Server or IIS Web Application.
We generally recommend using the Integrated Web Server, as it's easier to configure and doesn't require that IIS is installed. However, IIS is also supported and may be preferred in some cases when you want to use advanced hosting features or configurations that aren't supported in the Integrated Web Server.
If you've started with the Integrated Web Server and would like to upgrade your hosting to an IIS Web Application, all it takes is a few easy steps.
1. Change Configuration
The service looks in configuration to determine whether the integrated web server should be started.
The easiest way to change this is to navigate to the Configuration Tab of the Inedo Hub, click "Change Settings..." and then check the "Integrated web server enabled" checkbox.
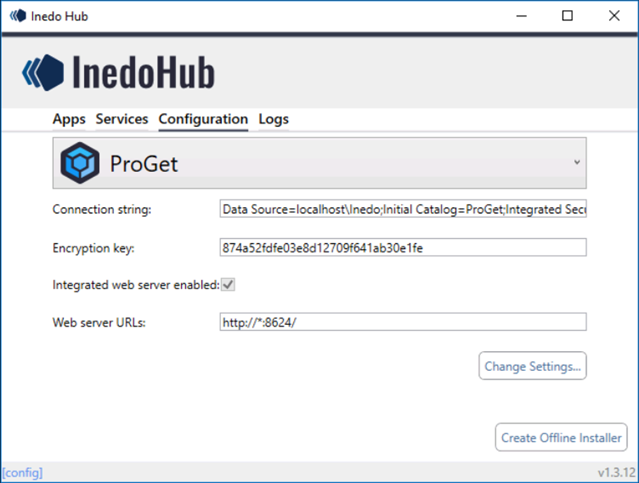
Alternatively, you can also edit the configuration file and change the value of the Enabled attribute to false on the key WebServer.
Legacy Versions (2017 and Earlier)
In older versions of Inedo Products, the integrated web server's configuration was stored in the database. These had to be changed as follows:
- Sign in to the product with an account that has administrative privileges
- Click the Admin link (top right corner of the navigation
- Click on Advanced Settings under the System Settings options
- Change the
UseIntegratedWebServerkey toFalse
2. Uninstall the Integrated Web Server (IWS)
You will need to stop and uninstall the Integrated Web Server (IWS) for the product you are looking to migrate to IIS.
- Identify the name of the web service name, which is typically:
- BuildMaster:
inedobmwebsrv - Otter:
inedootterwebsrv - ProGet
inedoprogetwebsvc
- BuildMaster:
- Open a Command Prompt with administrative privileges
- Stop the IWS Service by typing
sc stop «service-name» - Uninstall the IWS Service by typing
sc delete «service-name»
3. Create IIS Web Application
You will need to setup a new Application Pool and Web Site for each product in IIS.
Addtional v2022 Requirements
Starting in ProGet v2022, Otter v2022, and BuildMaster v2022, the ASP.NET 6 Core Runtime Hosting Bundle is required to host the web application in IIS. If you have not previously installed this, you will need to download the latest .NET 6.0 hosting bundle and install it prior to configuring your application in IIS.
Note:
Inedo Hub automatically installs the hosting bundle when selecting IIS hosting during a new install.
Important!
If the .NET 6 SDK or Hosting Bundle was installed prior to installing IIS, you will need to repair the SDK or Hosting Bundle after you install IIS.
Application Pool
To create a new Application Pool, you will need to perform the following steps.
- Open the IIS Manager
- Create a new Application Pool named
BuildMaster,ProGet, orOtterwith the following minimum configuration:
- .NET CLR Version - 4.0
- Managed Pipeline Mode - Integrated is recommended, but Classic will also work
Example PowerShell command to create an app pool for ProGet:
&"C:\Windows\System32\inetsrv\appcmd.exe" add apppool /name:ProGet /managedRuntimeVersion:v4.0 /managedPipelineMode:Integrated /processModel.identityType:SpecificUser /processModel.userName:ProGetServiceUser@domain /processModel.password:<account-password>
Additional instructions for creating application pools can be found here: Create an Application Pool in IIS 7.x
Note:
If the Inedo product's SQL Server connection string is configured to use integrated security, the application pool's process model identity requires proper access to your SQL Server.
Web Site
To create a new Application Pool, you will need to create a new Website (virtual directories are not supported) named BuildMaster, ProGet, or Otter with the following minimum configuration:
- Physical Path - the path on disk where the web application files are located
- v2022 and Later:
C:\Program Files\«product-name»\Service - Earlier versions:
C:\Program Files\«product-name»\Web
- v2022 and Later:
- Application Pool - the application pool to use (by default
«product-name») - Binding - the combination of IP address(es) and port(s) used to access the product over the network
Note that any of these values can be edited once they are created, for example, to add SSL certificates, update the port that ProGet is listening on, etc.
Example PowerShell command to create a ProGet 2022 site:
&"C:\Windows\System32\inetsrv\appcmd.exe" add site /name:ProGet /physicalPath:"C:\Program Files\ProGet\Service" /bindings:"http/*:80:" /applicationDefaults.applicationPool:ProGet
You may adjust other IIS site settings as desired.
Your product will now be hosted through IIS. The products aren't very particular about how they are hosted as long as the prerequisite roles & features are installed, so virtually any of the settings within the IIS Application or Application Pool can be changed to suit your needs.
Was this article helpful?

